How to start Plexamp automatically when you power on your Raspberry Pi
title: "How to start Plexamp automatically when you power on your Raspberry Pi"
source: "https://howtohifi.com/how-to-start-plexamp-automatically-when-you-power-on-your-raspberry-pi/"
author:
- "How To Hi-Fi"
published: 2024-11-02
created: 2025-02-15
description: "Use this guide to automatically launch Plexamp whenever you boot your Raspberry Pi"
tags: - "clippings"
Using a Raspberry Pi as a Plexamp Headless player has worked very well for me. It allows me to have a dedicated audio streamer for my personal music library, and my Raspberry Pi has a DAC attached for a clear, high quality analog output that plugs directly into my stereo or amplifier.
As someone who likes to tinker and experiment with my stereo setup, though, I’ve run onto a problem; each time I power down my Rapsberry Pi and power it back up again, I have to open up terminal on my laptop and manually re-start Plexamp.
That’s not fun at all when I’m re-arranging my listening room, or moving the Pi streamer to another setup altogether.
Luckily, it only takes a few simple terminal commands to ensure that Plexamp launches automatically each time you power on your Raspberry Pi.
This guide assumes you already have Plexamp installed and you’re able to launch the Plexamp player and use it as an endpoint to stream music from your Plex Library.
If you don’t already have Plexamp installed and running you should check out our full guide to Install Headless Plexamp for your Raspberry Pi to create a Plex endpoint.
Here is a list of tools and equipment that you should have on hand before you begin this project:
Supplies
-
A Raspberry Pi that is already running Plexamp
Plexamp is an add-on to your Plex Media Server. There are both free and paid premium versions of the Plexamp software, but Plexamp headless requires a Plex Pass.
This post assumes you are already using Plexamp in a Headless configuration with your Raspberry Pi.
- You can use other Command-line interface (CLI) tools for this. I prefer Terminal because it’s built-in to my Mac and is pretty lightweight and distraction free.
Launch Terminal or another CLI tool
2. ## Use SSH to log into your Raspberry Pi
3. ## Check your Username settings
By default the Plexamp package assumes the username is going to be pi, so that’s what’s been added to the plexamp.service file. If you’ve set up your Raspberry Pi with the Username pi, you can probably skip to the next step. Otherwise, if you have a different username, you may run into some issues getting Plexamp to run at start up.
If you don’t know your username, enter the following command in terminal:
whoami
Hit Enter and you’ll see your username listed.
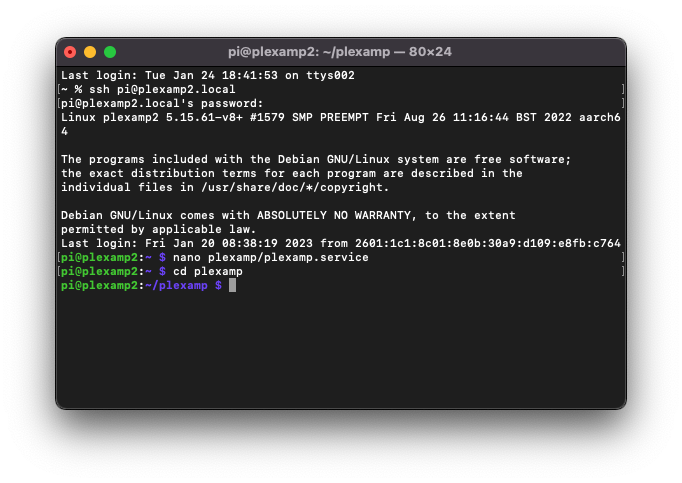
If the username is pi, you can skip the rest of this step. Otherwise, open the plexamp.service file with the following terminal command:
nano plexamp/plexamp.service
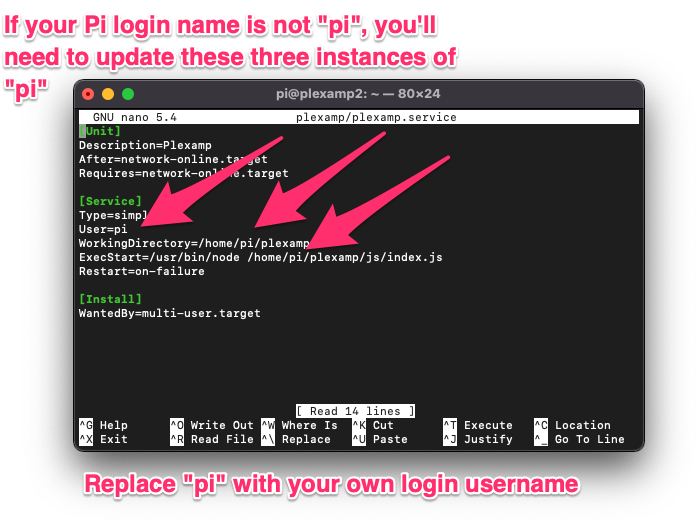
Scroll down to the line that says User=pi and update that to the username you set up in Raspberry Pi Imager and used to SSH into the Raspberry Pi.
You may also need to update the path in WorkingDirectory, and in ExecStart. Anywhere that pi is used will probably need to be replaced with your own system username.
NOTE: Some Operating Systems may require a different filepath to be used in plexamp.service.
- If you’re using DietPi you may need to remove the /home directory (see this comment)
Check your Username settings
4. ## Check if you're using Node Version Manager
With some recent changes to the way that Node is installed, some users have had to rely on Node Version Manager (NVM) to ensure they are installing the correct version of Node.
As of Plexamp version 4.10.1, Headless Plexamp requires NodeJS 20 to run. Using NVM could mean that your Node path will need to be updated.
Check if you’re using NVM with the following Terminal command:
nvm -v
If you see a version number returned, you’re probably using NVM. If you see some variation of nvm: command not found you can skip the rest of this step.
Check your Node version with the following command:
node -v
Now, open the plexamp.service file with the following terminal command:
nano plexamp/plexamp.service
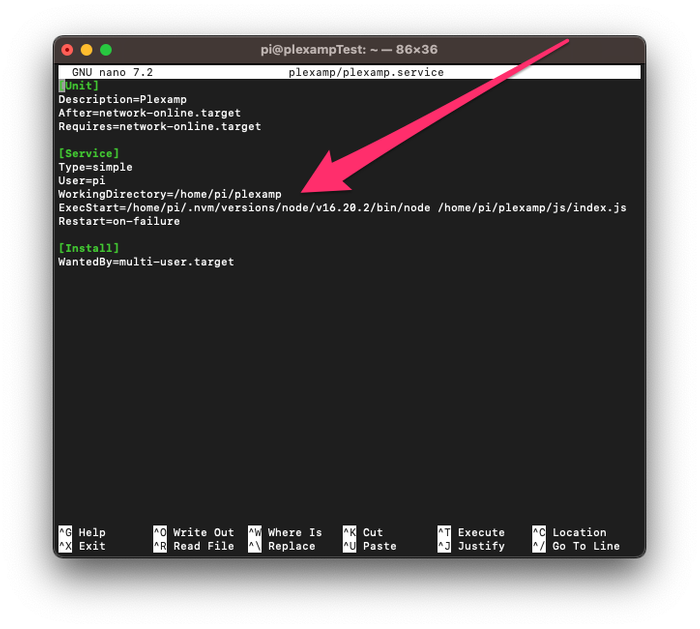
You’ll want to change this line:
ExecStart=/usr/bin/node /home/pi/plexamp/js/index.js
To this, instead:
ExecStart=/home/pi/.nvm/versions/node/v20.12.0/bin/node /home/pi/plexamp/js/index.js
NOTE: This assumes you’re using our guide to Install Headless Plexamp for your Raspberry Pi to create a Plex endpoint, in which case v20.12.0 is the correct Node version. If your version is different then you should replace that part of the line.
Also, remember to use your actual username ( in this example the username is pi )
Check if you're using Node Version Manager
5. ## Enable Plexamp to start automatically
Now, let’s configure your Raspberry Pi to automatically launch Plexamp on start-up. Navigate into the plexamp folder with the following command:
cd plexamp
Hit Enter
Then run through these 4 commands in Terminal:
sudo cp plexamp.service /lib/systemd/system/
Hit Enter
sudo systemctl daemon-reload
Hit Enter
sudo systemctl enable plexamp
Hit Enter
sudo systemctl start plexamp
Hit Enter
Enable Plexamp to start automatically
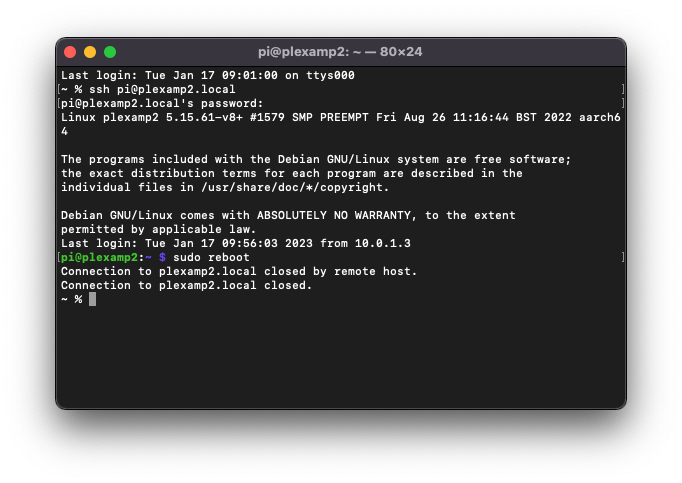
6. ## Reboot the Raspberry Pi
Reboot your Raspberry Pi with the following command:
sudo reboot
Hit Enter.
Give the Raspberry Pi a minute to reboot. If everything went according to plan you should now see your new Plexamp client in the list of available devices without having to manually launch the player.
You can also access your Headless Plexamp in your web browser by visiting the following url:
http://#.#.#.#:32500
Remember to replace the IP address from this example with your Raspberry Pi’s own IP address.
You can find the IP address for your Raspberry Pi by entering this command in Terminal:
hostname -I
Hit Enter
Reboot the Raspberry Pi
7. ## Learn how to update Headless Plexamp to get the latest Plexamp features